Translate

Showing posts with label kitbashing. Show all posts

Thursday, January 2, 2020

Athearn Boxcar improvement

Despite the many beautiful ready-to-run rolling stock available nowadays, I am still a big fan of the old Athearn Blue Box and Roundhouse (Model Die Casting) kits. Many can still be found unbuild, but at swap meets or from various Facebook Sales Pages, some are already built and more or less refined.


Recently I happened to acquire a 50' boxcar, among others, which was already assembled and upgraded with Kadee couplers and metal wheelsets, probably from Intermountain.


The car had been assembled following the instructions with the horn hook couplers replaced with Kadee's and the original wheelsets with better running metal sets. I must admit, on this car the metal coupler pocket clips had been mounted correctly. I simply hate them, because, for whatever reason, I never managed to get them on straight. After a while, the clip always fell off or the coupler did not sit correctly and drooped. 


Anyway, I disassembled the car into its basic components, which are only a few (body, floor, underframe, weight, and trucks)


With a small screwdriver, I unclamped the metal clip and the coupler came loose.


These early kits always have a lot of flash from the molding process, which prevents the parts from fitting flush. This was the case here with the underframe. A few passes with a sanding stick is a quick remedy to this.


Next, the coupler pockets had to go. This is quite easy using a razor saw.


Another step I always do on boxcars, turning the floor. Normally the boarded side goes up into the body. On boxcars with opening doors, this might be a nice detail, but as the boxcars usually run with doors closed, this isn't visible either. On the 50 footers I bought, the doors cannot be opened. By turning the boarded side down, the floor really looks like the real thing, because that's what you normally see from underneath. I simply screw the underframe to the turned floor and for a permanent fix, I also glue the frame to it.


Then I glue the lid of the Kadee draft gearbox to the floor, taking care to center it. After the glue has set, using the center hole as a guide, I drill and tap for a 2-56 screw.


Then I assemble the draft gear box and secure it with a screw.
 

I attached the metal weight to the floor using double-sided tape. This is no permanent fix, believe me. A small piece of leftover styrene, drilled to fit over the "original" bolster pin and then secured with a few drops of cement will keep the weight in place.


I will never open this car again, so I glued the floor assembly to the body. The clamps make sure that the bond will be permanent.


A final detail, which is quickly added consists of replacing the oversized steps. I simply snapped the original steps off using a small sprue cutter. Don't bother to drill into the sides! Chances are that your drill slips. I drilled immediately behind the side, next to the floor and inserted A-Line wire steps. These are not only smaller, but also sturdy.

Remember, this is not a contest model. My primary goal is to have a reliable car intended for operation. Nevertheless, some of these tips may also be a base for a better-looking model.

Stay tuned. In a future installment, I'll show you a quick weathering technique. 


Tuesday, October 8, 2019

Building a switching layout (Part 7) Billboards


We see billboards and outdoor advertisements all around us, everywhere we go. In modeling they not only add a sense of reality but also help to set the timeframe or era we are trying to reproduce.

My switching layout is set in the late 1960's to early 1970's. This was a time of great change. The youth stood up to demonstrate against the establishement, the Vietnam war was in everybody's mouth and muscle cars still roamed the streets. This was also reflected in the advertisements of the time.


In the picture above, I modeled an interstate exit over the rail yard with appropriate highway signs but also two billboards which perfectly reflect the mood of these times. Love and Peace on the left and a more conservative ad reminding us to send our next letter to our boys in Vietnam.

A quick search on the internet will bring up hundreds of period pictures of billboards and advertisements. I only selected signs without specific dates. These are most common on automobile ads, as they usually praise a car of a certain model year, like 1968 Ford Mustang. I did not model one specific year, but wanted to give a feel of this era. 


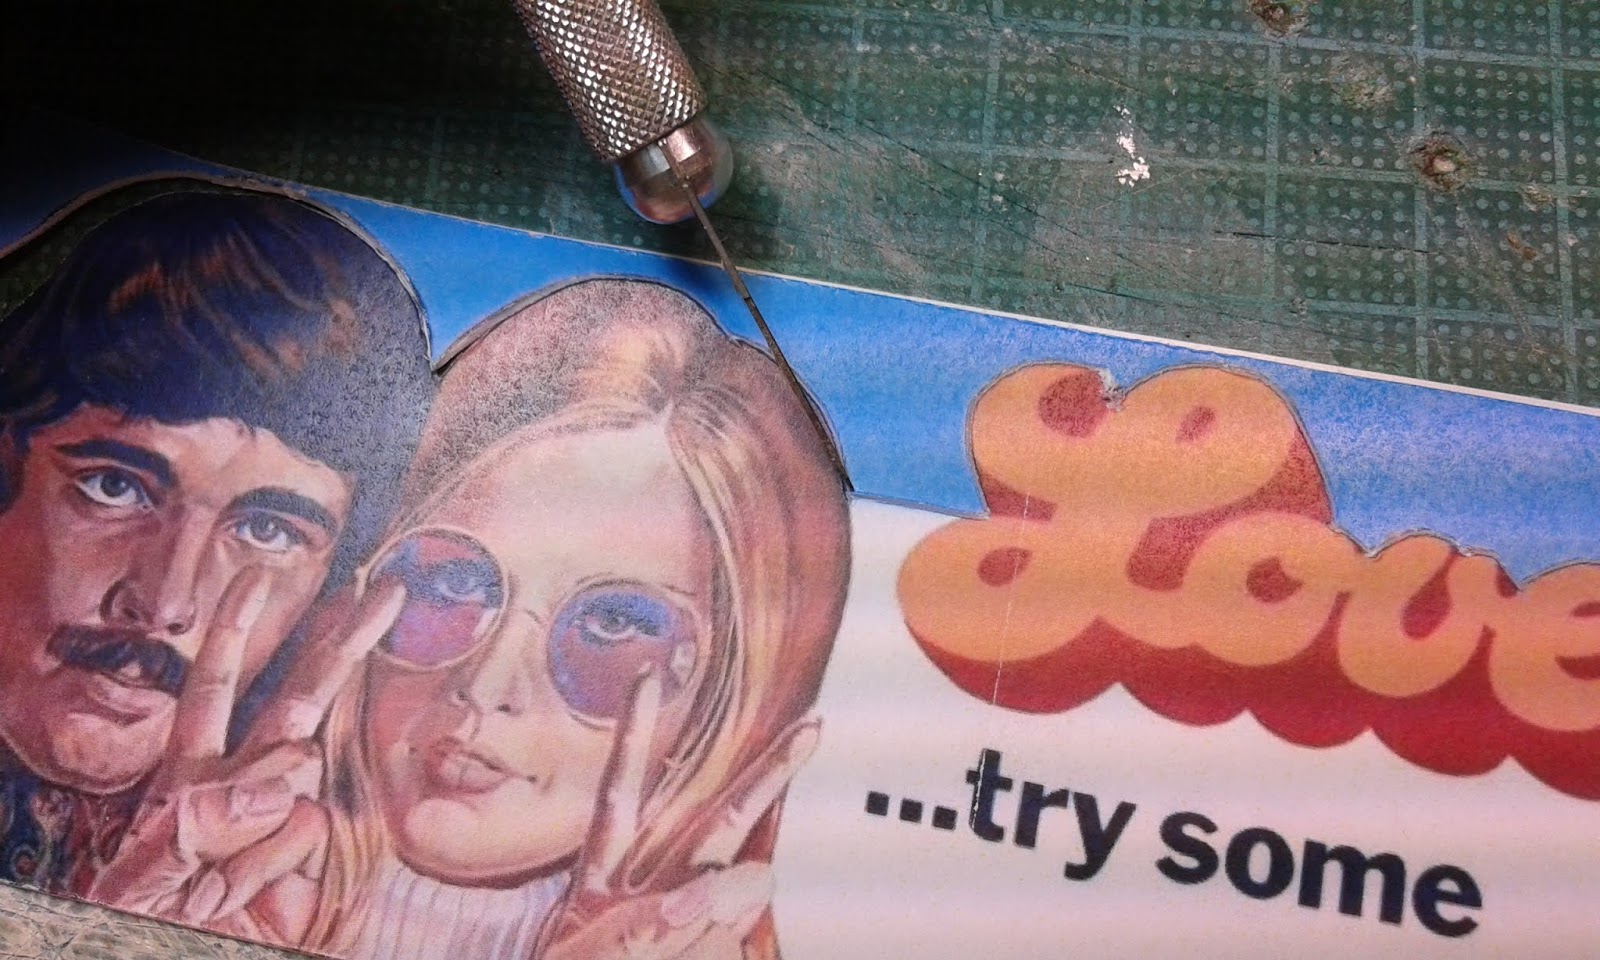
The Love...try some sign immediately caught my eye, because it reflects the feeling of the time, Make Love, Not War, with a little hippie touch. Also it extends over the boarders of the billboard, which gives the sign more visibility.


 I downloaded the picture and resized it accordingly. Then I printed it out and glued the sign to a piece of .015" plain styrene. Using a fresh #11 blade in my hobby knife, I cut the overhanging contours out.


The sign looks some kind of special now


Then I added some braces to the back of the sign and a walkway as well.


 I mounted the billboard to a styrene tube and installed it on the layout next to the highway bridge.


Seven-Up at the time had many psychedelic looking advertisements. This one seems to be inspired by the Beatles' Yellow Submarine.


I used a wooden billboard frame from Blair Line to mount the 7-Up Poster and attached it to the side of the distributing facility.

Another special billboard I absolutely wanted on my layout - the Marlboro Man.


I mounted the image in the same way as the Love billboard above. Plain styrene sheet, reinforced with styrene C-channels. I don't claim to have done it prototypically because it will not be seen from the back side.


I found that a wooden dowel fits exactly into the styrene tube. I used it to stiffen the tube while mounted on the layout. If needed, I could also remove the billboard. I did the same with the Love billboard.


Here the sign is installed on the other side of the highway bridge.

Although advertisements for cigarettes are more and more banned from our daily life, back in the 1960/70's they were a predominant sight. Famous actors and stars gave us the impression, that we only needed to smoke the same cigarettes to become as famous as they are.


I mounted the large Salem brand advertisement to the side of a small business next to the aisle on the layout.


Another slogan seen all over the place in the early 1970's was issued by John Lennon and Yoko Ono, saying "War is over, if you want it!". Again, I wanted this one on the layout as a reference to the opposing opinions about the Vietnam War in those days.

Another sign I like, is the Dollar Rent-a-car key sign, next to the building.

Billboards on building roofs were and are still very common. There are limitless possibilities to add character to any layout, using period billboards and signs.

Friday, January 13, 2017

Building a switching layout (Part 5) Building interiors

ACME Tool & Die Manufacturing

 One of my industries is build from an old Revell kit. I build it straight out of the box and added some vents and blowers to the outside. Bu because it's located near the edge, people can easily see the interior. The kit even had no floor so looking into a bare empty building was not an option for me. Building these ancient kits is always some kind of a challenge, so I've cut a floor and a separation wall from .040" Evergreen plain styrene.


I also gave it a new name. A bit of weathering and rust and the outside looked about right.


To avoid that one could look right through the building I installed a styren wall at an angle to hide the rear windows. I added a couple of signs and posters to simulate the back wall of the machine shop. I also installed lighting to make the machinery inside visible.


I had a bunch of workshop machinery from Preiser (??) lying around for years and now they finally got a purpose. I painted the machines and glued them to the styrene floor.


As workers I chose several auto mechanics from Woodland Scenics, because they came in appropriate poses of kneeling or holding a hood open etc. I placed them next to the machines as if they were working on them.

PROCTER & GAMBLE Distribution Center


I needed an industry with truck loading doors and loading doors to spot railcars inside the building on the left side of my layout. As no appropriate kit was available I decided to build what I needed from scratch.


I build almost all my buildings using plain and textures styrene sheets from Evergreen or Plastruct. A wall consists normally of a plain styrene base with textured sheets like siding or brick pattern laminated on top. All window and door openings are cut into the plain styrene either with a hobby knife or a Micro Mark nibbler tool. The final textured siding is cut and sanded exactly around the openings so that the door and window castings fit snuggly. Here I also build the loading doors and trim from scratch. 


I wanted the loading doors open to show a fake interior. I had tryied this already on another model and it added a nice touch to a backdrop model. To do this I had to install small shadow boxes behind the door openings. I built them with pieces of scrap styrene.


On the internet I googled for pictures of interior shots of storage facilities. There are plenty. I chose pictures which are taken straight on or showing the right or left side of a row of storage racks, depending from which side the door may be viewed.


I scaled the pictures to fit into the shadow boxes. I installed them curved like in the picture. This eliminates sharp corners. Then I closed the shadow boxes with a lid from plain styrene.


The fake interior gives the impression of a large storage area.

Oil Distributor


I used the small office building from the Oil Distributor kit from Pola/Model Power to fill a small spot on the right side of my layout.


I built the kit right out of the box and also included an office interior. Faller and Preiser both offer various interiors with furniture and everything need for an interesting scene.


I installed Micro SMD interior lights to show what's going on inside. The little dude seems to watch something interesting. If you want to know visit me at the US Convention in Rodgau Germany in October 2017.

As always, stay tuned for updates.

Tuesday, December 27, 2016

APA Micro Layout (Part 16) - Detailing the Fiddle Yard (Part 5)

Most of the structures for my second box of the APA Micro Layout came from left-over parts from different kits.

I also wanted to try out another weathering technique using oil paints and turpentine to recreate fading and running colors. An old boxcar shell came in handy for this project.


I also dusted the shell with pigments. On the Ford Coupe for my hobo camp scene, I used one of the IHC body castings that came with a structure kit. I applied some rust patches and sprinkled rust powder into the still wet paint.


Here is a view of the finished scene.


I installed two light sockets from Brawa by drilling two 6mm holes into the baseboard

I like to add small scenes telling a story. Here a Bekins truck is backing to the loading door. A worker is giving hand signs to guide the driver.


The forementioned hobo camp.


Another over-all scene with trucks and cars in place.


I applied some weathering to the shop walls. A clerk is watching the truck's manoeuvres.


The lights are installed and working, while another truck driver prepares to leave.


Overall view of the fiddle yard box. Note the effect of the box art backdrop.

Thanks for dropping by. More to come. Stay tuned.