Translate

Showing posts with label Scenery. Show all posts

Friday, February 12, 2021

Building a cheap electric static grass applicator

Standing grass is a very realistic scenic feature on every train layout or diorama. Unless you are really building large layouts professionally, you don't need one of these expensive tools which quickly cost in the 100 Euro range. That's my opinion and the bucks saved can be invested into more models. So, if you want to know how to save money without missing the opportunity of having good looking grass on your layout, keep on reading. I'll show you in a couple of steps how to do it.


There are multiple designs of electric fly swatters, so it doesn't matter which one you choose. The blade will be removed anyway. The electronics inside is always the same. Look for a model where the two halves are screwed together. Otherwise you will destroy the handle.


The fly-swatter consists of a handle to which the swatter is attached with a couple of screws. When unscrewing the two halves the swatter may be detached from the handle. A small electronic board provides the high voltage needed. I detached the two wires and discarded the swatter.

The biggest problem consisted in finding a plastic sieve with a metal mesh. Any other metal sieve would also work, but then the danger of accidentally touching the sieve and getting an electric shock would be higher.

I shortened and drilled two holes in the handle to fit over the two pins that held the swatter before. This could be different, depending on what swatter you have. A bit of improvisation is advisable. 


 I soldered one of the wires to the mesh.


Then I lengthened the other lead with a clamp on one end. This is the ground wire, which will be clamped to a screw or nail inserted into the scenery.


To avoid using batteries, I soldered two wires to the battery contacts to power the unit with a external power pack.


I bought a 3V / 1 Amp power supply for less than 3 Euros and connected it to the wire using a male and female plug.


My power cord is about 2 meters long, which is enough to move around freely.


I attach the ground clamp to a screw, inserted in the center of my workspace, where I want to plant my static grass.


The advantage over an applicator with a pot is that you may reach lower areas easily.


Nevertheless I could not resist to buy one of the cheaper offerings with a large pot and two different styles of mesh. This one makes applying longer static grass easier. Next I will change it to external power also.


The small sieve is ideal for the short 2mm fibers


Here is an example of static grass applied to seaweed for bushes and in tree making.


My first attempts with static grass application.


DISCLAIMER: Be aware that this electric device may cause an electric shock. If you build it, you use it under your own responsibility.

Tuesday, October 8, 2019

Building a switching layout (Part 8) Finished

Below is a stitched together image of the switching layout.


The two pictures below show the layout at its first appearance at the US-Convention in Rodgau/Germany back in 2017.


Below are some of the scenes I created. There are still some details to be added.


I am looking forward to meet you at one of the shows in Europe. 

Building a switching layout (Part 7) Billboards


We see billboards and outdoor advertisements all around us, everywhere we go. In modeling they not only add a sense of reality but also help to set the timeframe or era we are trying to reproduce.

My switching layout is set in the late 1960's to early 1970's. This was a time of great change. The youth stood up to demonstrate against the establishement, the Vietnam war was in everybody's mouth and muscle cars still roamed the streets. This was also reflected in the advertisements of the time.


In the picture above, I modeled an interstate exit over the rail yard with appropriate highway signs but also two billboards which perfectly reflect the mood of these times. Love and Peace on the left and a more conservative ad reminding us to send our next letter to our boys in Vietnam.

A quick search on the internet will bring up hundreds of period pictures of billboards and advertisements. I only selected signs without specific dates. These are most common on automobile ads, as they usually praise a car of a certain model year, like 1968 Ford Mustang. I did not model one specific year, but wanted to give a feel of this era. 


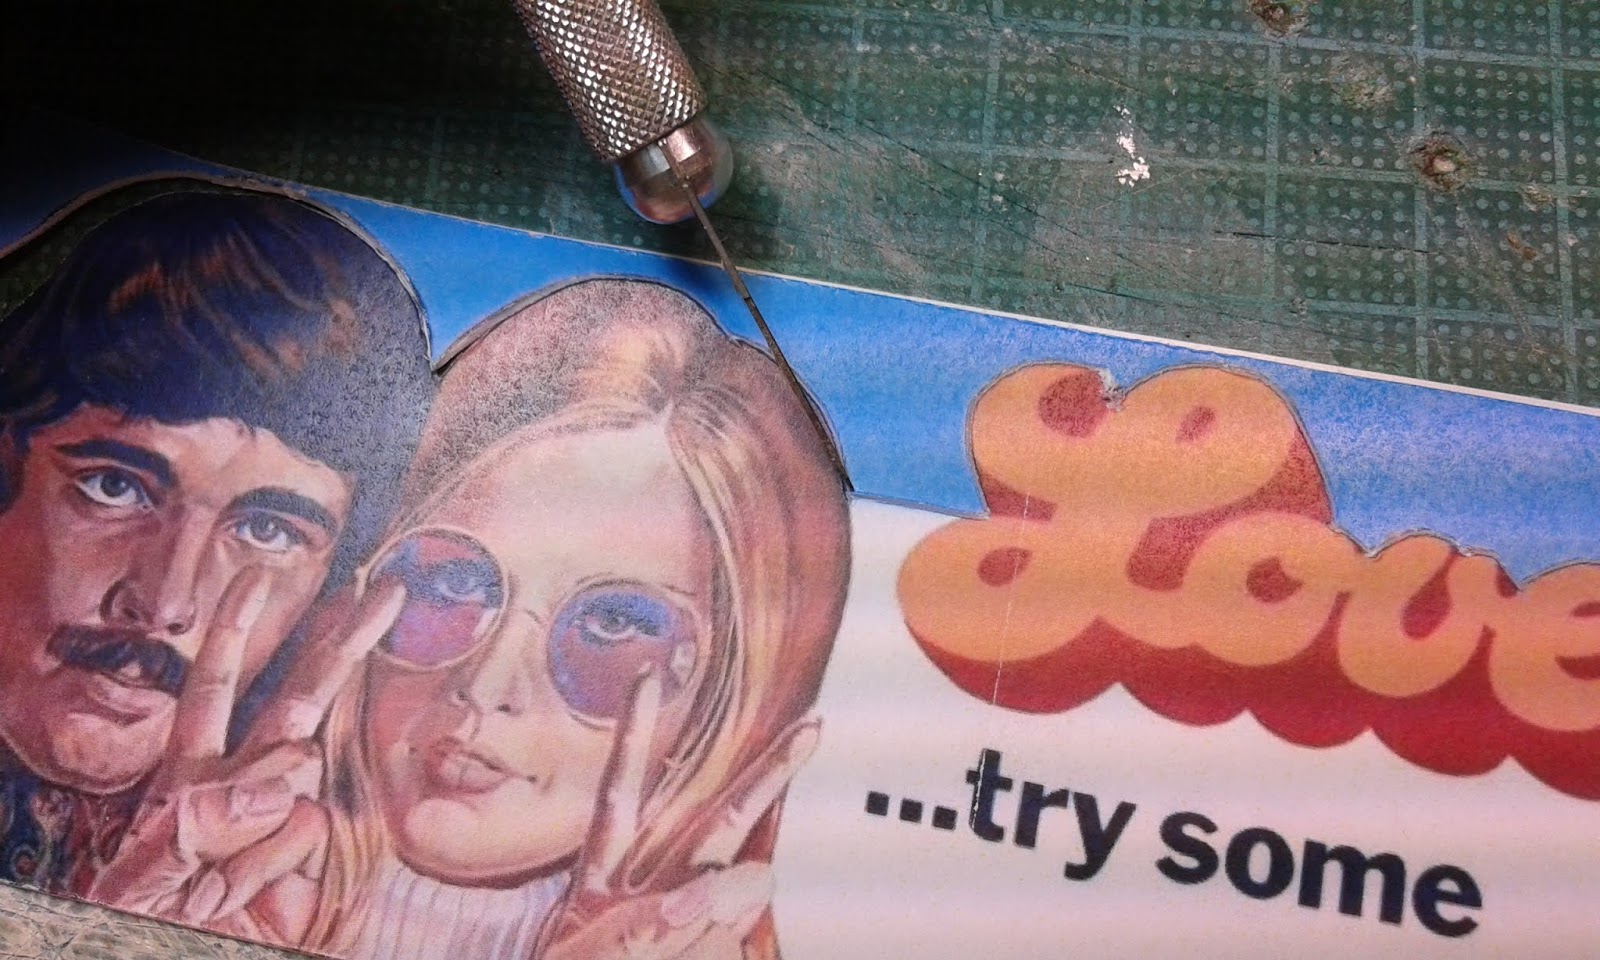
The Love...try some sign immediately caught my eye, because it reflects the feeling of the time, Make Love, Not War, with a little hippie touch. Also it extends over the boarders of the billboard, which gives the sign more visibility.


 I downloaded the picture and resized it accordingly. Then I printed it out and glued the sign to a piece of .015" plain styrene. Using a fresh #11 blade in my hobby knife, I cut the overhanging contours out.


The sign looks some kind of special now


Then I added some braces to the back of the sign and a walkway as well.


 I mounted the billboard to a styrene tube and installed it on the layout next to the highway bridge.


Seven-Up at the time had many psychedelic looking advertisements. This one seems to be inspired by the Beatles' Yellow Submarine.


I used a wooden billboard frame from Blair Line to mount the 7-Up Poster and attached it to the side of the distributing facility.

Another special billboard I absolutely wanted on my layout - the Marlboro Man.


I mounted the image in the same way as the Love billboard above. Plain styrene sheet, reinforced with styrene C-channels. I don't claim to have done it prototypically because it will not be seen from the back side.


I found that a wooden dowel fits exactly into the styrene tube. I used it to stiffen the tube while mounted on the layout. If needed, I could also remove the billboard. I did the same with the Love billboard.


Here the sign is installed on the other side of the highway bridge.

Although advertisements for cigarettes are more and more banned from our daily life, back in the 1960/70's they were a predominant sight. Famous actors and stars gave us the impression, that we only needed to smoke the same cigarettes to become as famous as they are.


I mounted the large Salem brand advertisement to the side of a small business next to the aisle on the layout.


Another slogan seen all over the place in the early 1970's was issued by John Lennon and Yoko Ono, saying "War is over, if you want it!". Again, I wanted this one on the layout as a reference to the opposing opinions about the Vietnam War in those days.

Another sign I like, is the Dollar Rent-a-car key sign, next to the building.

Billboards on building roofs were and are still very common. There are limitless possibilities to add character to any layout, using period billboards and signs.

Wednesday, April 5, 2017

Building a switching layout (Part 6) Ballasting and ground cover

Ballasting

I ballasted the track with a grey blend mix from Woodland Scenics.


After the ballast is leveled between the ties, I wet the whole area with wet water from a spray bottle. I use distilled water with a few drops of Isopropy Alcohol added. You could also use a drop of dishwashing solution, but it tends to bubble if you add too much.


With a pipette or eye dropper, I drizzle the scenic glue onto the wetted ballast. I usually use matte medium or carpenters' white glue thinned 1:7 with distilled water and again a few drops of Isopropy Alcohol added to make the glue creep between the ballast.


Extra care should be taken on turnouts. After the glue has dried, the points and closure rails may stick to the ties. Also the switch tie may have bonded to the subroadbed.


To avoid glueing the moving parts of a turnout, I simply don't add glue to the switch tie area. If the rails and ties are weathered or painted, this isn't visible right away, especially if the turnouts are farther back. The crossing above will be located behind a building, so it cannot be seen anyway.


While the glue sets, I add fine turf and static grass to the ballasted area. This of course only on indutry trackage or rarely used tracks.

Asphalt or tarmac

For some time now, I use 3mm cork sheets under my tracks or to model parking or loading areas and roads. It lifts these spaces above the surrounding subroadbed.


I painted these areas with Heki Asphalt Paint. This paint is thick enough, so that normally one coat is sufficiant.


Another advantage of cork is, that you may scratch out small pieces to represent potholes.


The area between the rails is filled with wall compound. Before it hardened, I scribed the flangeways free along the rails.

Potholes and asphalted cobblestones

As already mentioned before, potholes are easily modeled using cork sheet for roadbed.


On my loading area between the tracks, I wanted to represent a special kind of road damage. Many loading areas and street used to be laid out with cobblestones, which were simply covered with asphalt, to achieve a smoother surface. Unfortunately, heavy traffic and the weather caused the asphalt to break occasionally. These broken asphalt bits were torn away over time and exposed the cobblestones underneath, causing a rather bumpy road surface.


To do this I randomly cut out some more or less round shapes from a Vollmer cobblestone pattern styrene sheet using a pair of scissors. Then I placed the pieces on the cork and traced the outlines with a black permanent marker.


With a chisel blade, I carved the cork out following the outlines.


The styrene sheet is approximately 1 mm thick, so it gives a nice recess.


I glued the cobbelstone pieces down into the recess and painted them a light brown/kakhi color.


Then I filled the edges with wall compound and touched up the paint.


Now the loading area looks a bit worn out from the heavy traffic.

Next step will be weathering and detailing.

Stay tuned!