Translate

Tuesday, December 27, 2016

APA Micro Layout (Part 16) - Detailing the Fiddle Yard (Part 5)

Most of the structures for my second box of the APA Micro Layout came from left-over parts from different kits.

I also wanted to try out another weathering technique using oil paints and turpentine to recreate fading and running colors. An old boxcar shell came in handy for this project.


I also dusted the shell with pigments. On the Ford Coupe for my hobo camp scene, I used one of the IHC body castings that came with a structure kit. I applied some rust patches and sprinkled rust powder into the still wet paint.


Here is a view of the finished scene.


I installed two light sockets from Brawa by drilling two 6mm holes into the baseboard

I like to add small scenes telling a story. Here a Bekins truck is backing to the loading door. A worker is giving hand signs to guide the driver.


The forementioned hobo camp.


Another over-all scene with trucks and cars in place.


I applied some weathering to the shop walls. A clerk is watching the truck's manoeuvres.


The lights are installed and working, while another truck driver prepares to leave.


Overall view of the fiddle yard box. Note the effect of the box art backdrop.

Thanks for dropping by. More to come. Stay tuned.


Building a switching layout (Part 4) Naming the industries

For my idustries I always try to find some "real" brand names that actually existed or still exist for the locale I am modeling.

The easiest way to search for the appropriate industries is doing an internet search.

I settled on three major companies for my switching layout.

1. Georgia-Pacific, well-known for its paper and tissue products


I assembled the backdrop structure on the left side from DPM wall sections and for the right brick wall I used plain styrene and laminated the brick sheets to it. The walls are all attached to the backdrop with double sided tape.


2. Acme Packing Company, formerly known as Indian Packing Company that was involved in the canned meat industry. Today the company is remembered as the namesake of the Green Bay Packers. The football team took its name after Curly Lambeau, a shipping clerk for the company, successfully asked the company's owner for money for jerseys and use of the company's athletic field in 1919 (the stadium of the Green Bay Packers is named Lambeau Field)

The Acme Meat Packing Company cloese in June 1943 because of supply shortages related to WWII and never reopened after the war.

I absolutely wanted a reference to the famous football team on my layout, so although the company doesn't exist any more, I still have a warehouse with a faded sign, remebering it. 


This structure is completely scratchbuilt by laminating brick sheets to a plain styrene sub-base. The windows and loading doors came from my scrap box. The canopies above the loading doors are from Auhagen.


I added blowers and air vents from Rix, Kibri and Auhagen


3. Procter & Gamble is manufacturing paper products in Green Bay, but as I already have GP as a paper industry I use the P&G structure as a distribution center for the other brands they sell.


This distribution center was scratchbuilt to fit the available space with a sub-base of plain styrene. I added brick sheet to the lower parts and metal siding above.

I had no idea what kind of buildings I would put on the layout when I started building it. So I first laid the track and then imagined the industries. Why do it the easy way if you can do it the hard way.
But hey, model railroading is fun, right?

Wednesday, November 23, 2016

APA Micro Layout (Part 15) - Detailing the Fiddle Yard (Part 4) - Trucks

I still had a couple of Athearn truck kits lying around and after close examination I found that they needed a bit of upgrading.


One model was a cabover tractor and trailer lettered for Bekins Moving. The other one was a Freightliner long nose tractor.

All these models come without cab interior and almost snap together.

From my scrap box I used bits of styrene to add a floor and shaped the backs of the seats. I test fitted a Preiser driver figure behind the steering wheel. These plain unpainted figures are cheaper than the painted ones and a box has over 52 different poses.


Then I painted interior medium grey and glued the painted driver figure on the seat.


I touched up the lights on top of the cab and added A-Line side mirrors.


I also painted the side and rear lights on the trailer. A feature that is often forgotten are the license plates. I downloaded a bunch from the internet, scaled them down to HO and printed them out on a sheet of paper. I cut out a pair and attached the plates with a dot of tacky glue.


Another nice touch are the air hoses. I wound a piece of wire around a small dowel to achieve the coiled look.
 

To give the trucks another realistic touch, I bent the front axle and attached the wheels so as if they take a turn.


The long nose tractor received the same treatment, by touching up the lights and adding side mirrors.


As a final touch I added a bar across the rear and attached mud flaps from A-Line.

This is a fairly easy evening upgrading project if you don't have a Herpa truck on hand.

Stay tuned as I continue with the detailing of my APA micro layout.


Friday, September 2, 2016

Building a switching layout (Part 3) The structures

As mentioned in my previous post, I have to scratchbuild most of my structures to fit the available space. The location of my switching layout is an industrial district in the city of Green Bay, Wisconsin. The predominant structures are a paper manufacturer Georgia Pacific, Green Bay Cheese and ACME Packaging. These are all companies located in Green Bay, although I do not try to recreate a prototype situation on the layout. I only want to deal with companies that actually existed or still exist there.


For the large brick ACME Packaging Company I assembled the walls using brick sheets from Vollmer and lined them with strips of .060" plain styrene to represent the concrete pilasters.
Previously I cut the openings for the windows with my hobby knife and the nibbler tool from Micro Mark.


The ACME building fits an odd space along the backdrop, so using my paper templates, I cut a base and roof from a sheet of .040" plain styrene. From scrap pieces I added corner braces to attach the side walls and square tubing to support the roof.


The opposite side wall is larger and gives the structure a trapezoidal shape.


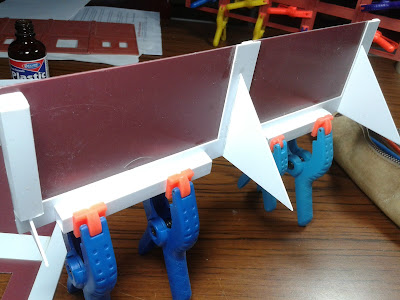
Small and medium clamps come in handy to hold the walls until the glue sets. Then I sprayed the pilasters with concrete color from a rattle can. After the paint had dried thoroughly, I masked the pilasters using Tamyia masking tape.


Then I sprayed the brick walls with red primer. After the paint had dried I removed the masking tape.


The photo above shows the building in its future location, ready to be weathered. I used roll-up doors and industrial windows from my scrap box.


Next I assembled another brick wall with the same technique as on the packing company, with the only exception that I used Plastruct brick sheet on a plain styrene base. The Vollmer sheet are thicker (.040") and do not need a supporting layer.


This brick wall is attached directly to the right side wall of the layout box. The adjoining structure was assembled from different DPM wall sections with their appropriate windows and doors.


The entrance to the staging yard will be partly hidden by a Rix highway bridge, put in place temporarily. The building near the edge is a vintage Revell kit. I am not decided yet if I include an interior to this building, which would be visible through the many large windows.


In this view we see the status of the structures so far.


Then I weathered the red brick walls with a mortar wash, mixed with Tamyia medium grey (close to concrete) paint and Isopropyl alcohol.


Here I'm painting the window sills on another DPM building. I had to shorten one wall to fit it between two tracks.

More to come. Stay tuned.

Monday, August 29, 2016

Building a switching layout (Part 2) Planning and painting

After all the track and turnouts have been wired, I hooked up a simple transformer and made a couple of passes through all the turnouts and spurs. I used one of my analog Walthers/Life Like P1K Alcos with one 50' Boxcar to see if there are no dead rails.


 I laid all the track and turnouts on cork roadbed, not for sound reduction but only to get the track raised above ground level. The wider strips of cork will be my roads.


I did not build the tracks to fit along the structures that I would use. This would be too simple. Guess I'm joking here. I already regret my decision. This implies that I have to build all my structures to suit my existing track arrangement. It's like on the prototype.


To start with, I measured my available spaces between or next to the tracks and fashioned paper templates with the footprints of the future buildings.


Except for the footprints, at this stage of construction, I had no clue of what buildings I would put there. I relied completely on my considerable stash of scratchbuilding material and leftovers from previous kits.


In the meanwhile I filled the screw heads and sanded the facia and valance smooth in preparation of the painting. The backdrop already received a coat of sky blue. To some the sky might be too "blue", but most of what you see there will be covered with backdrop buildings anyway. I like the strong blue color because the sky is actually blue on the photos and not grey or white with a backdrop that is painted with a lighter color.


The access to the staging yard cassette will also be hidden by a corner building and a highway bridge.


Most spur tracks will only hold one car plus engine.


A bird's eye perspective of the layout. The lighting fixtures are behind the upper valance.


You don't need as many clamps to hold the sideboard until the glue has dried, but I had enough of them at the club, so I probably did a bit of overkill. ;)
 

That's the staging area which basically hides a turnout to form a runaround. Because of the turnout, there is not enough room left to switch cars, so I added a short (2 car length) extension.
 

I usually paint my fascia and valance black. It makes a better contrast with the lighted interior of the box. This is the left side view of the layout....
 

..and here the right side. I also recessed the turnout controls to avoid damage during transport and operation.

Thanks for following and now it's time to build some structures.